I decided I needed on board air in my Jeep Wrangler TJ. One day I
went to Cat Canyon outside of Delta, Utah. There was a crazy guy
on the trail that day; he was driving a big red full size Ford
Bronco. Did I mention this guy was kinda crazy, Let's just call
him Larry, well anyway that day on the trail he blew 3 tires, popped
them right off the bead. So he used his spare, his friends spare,
and some other guy's spare from Salt Lake. Only after he ripped a
large hole in his passenger door, did he try to get out of there alive.
What does this have to do with On Board Air? (OBA). Well if we
would have had a good supply of air we could have fixed the tires as
quick as he could pop them off the rim. I have fixed many tires
on the trail with my air system since then.
Well I digress. On board air comes in a many different varieties,
from simple to complex the more complex the more powerful they
are. You could start with a small portable 12 volt air
compressor, you could use a smaller permanent compressor that comes
with your air lockers, or you could get a compressed CO2 tank. A CO2
tank will be powerful enough to air up tires and run air tools. One other option is to get one of the newer bigger hard mounted
compressors from Oassis, or Kilby.
I decided that I want to get a big powerful air setup after I
researched my options settled on a York Air compressor, and a
collection of on board air accessories from OnBoardAir.com, or Kilby
Enterprises. The setup is also known as the "Air Condition Pump" style OBA system.
When you are getting ready to install an air system, first you need an
advanced technical degree in fluid and pneumatic power dynamics, you
also need a degree in electrical engineering, and you need to have an
advanced set of mechanical skills. We ok maybe that's a bit much,
but to install a complete OBA system you do need to understand a bit
about both air(pneumatic) and electrical systems.
I started making a list of things I needed, first the air compressor,
mounting brackets, belts and pulleys, new air connection for the top of
the compressor, hoses, gauges, air filter, shut off switches, pop off
valves, an air tank, air quick disconnects, hoses, and tools.
That's just for the pneumatic side of it. For the electrical side
you need a manual switch, a fuse, a combo pressure/electric shut off
switch, wire, connectors, and working clutch on your air compressor.
So off to OnBoardAir.com I went. I found all the different models
of Jeeps and trucks that they have kits for and started to find the
parts I needed. I thought to myself I have a welder and I'm not
afraid to use I can built my own brackets. Well Jeep has been
doing a good job of moving stuff around under the hood so it seemed
like every year TJ with and without AC has a different bracket.
Kilby Enterprise's has done a fantastic job figuring this all out so I
purchased there complete bracket kit. I also got an input filer,
a pressure/electrical switch, and an adjustable safety pop-off valve,
and the most important part a pulley to drive the new air pump.
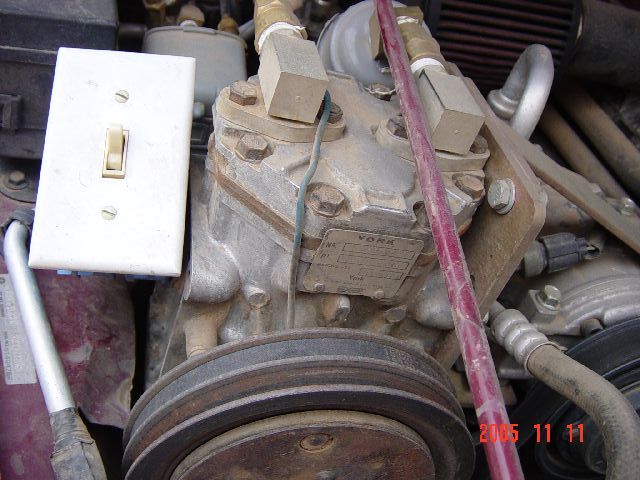
Now I needed to find a York air condition pump. Kilby sells these
new but they are a bit spendy. So off to do some more research, I
downloaded the owner's manual for a York compressor and found out there
are 3 different models. Each one a different internal size and
displacement, you want to find the largest displacement one
possible. I found out that a lot of older AMC Eagle cars,
Mercury's, and Ford trucks had these York compressors. So off to
the junk yard I went. I first made the mistake of asking the junk
yard guy if they had York compressors and the telling them what I was
doing. They all looked at me like I was nuts. So I just
started going to the really redneck do it yourself places. I
found a bunch of Sandene compressors; these are the little round
compressors that use the Freon to lube them. You want to find a
York which has an internal oil sump. Well any way I found 3-4 and
picked the best one, off an old Ford truck. I even found one with
nice input and output hoses that I could have used, but later I opted
to get new ones from Kilby. Note: you can use your existing AC
pump or a Sandene, it's a just a bit more complicated you need to add
and Air oilier system to the input of the compressor and an oil filter
on the output to recover the oil.
So back to the garage I went. I made sure to test the clutch on
the compressor, once you complete the circuit with 12 volts you should
here a "click" and the outer pulley should lock up and start to turn
the compressor cylinders.
Now we are getting close to the install time, it will only take about
10 more trips to the store to get all the final pieces. The
install requires some thought, at this point you need to figure out the
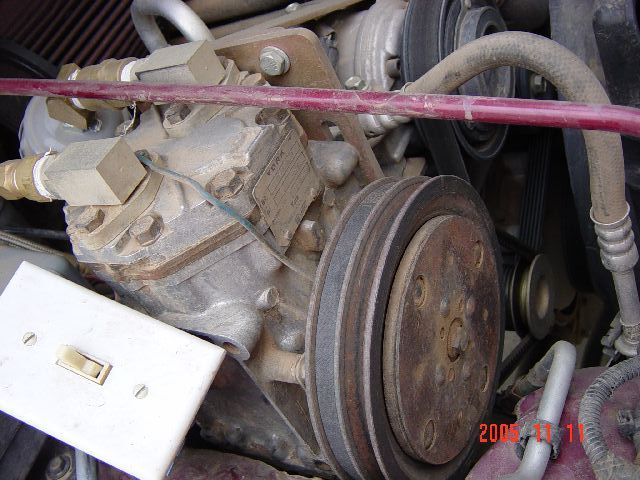
plumbing and the wiring. The York mounts in place of the existing
stock TJ air intake. So pull the stock air box out and read the
directions on the mounting bracket. You need to take off the
existing TJ AC compressor and place the Kilby bracket under it and
replace the TJ AC compressor. While you have this off you need to
remove the pulley on your alternator and replace it with the nice new
double pulley that came from Kilby. This pulley has a space for
the engines serpentine belt and a new v belt to power your York
compressor. After putting this all back together and install the
York on the new brackets you will see that a new V belt needs to go
between the York and your alternator. Kilby supplies a belt, but
because of the many styles of junkyard York's you may need to measure
this and get a new belt. One note, on the 1999 TJ with AC like my
install I had to cut a big piece of the inside fender well out.
Your install may differ depending on the year and model of your
Jeep. After I cut the fender out I got a nice heavy floor mat and
connected it to the inside of my fender to keep mud out of the engine
bay and off the compressor.
Now for the plumbing, I headed off to Evco house of hose with all my
connectors, the pressure switch, the two connectors for the top of the
York, the input to my tank and my pop-off valve, and quick
disconnect. I went into Evco in Provo and prepared for the
routine, "What are you doing, That's weird, using an AC pump for air in
a Jeep?" I was getting used to the routine. But to my surprise I
said I'm putting a York in my Jeep, and the guy said "Great, man that's
cool, my brother did that, I know just what you need." So
he set me up with all the right connectors and this really nice hose
that has these slip together connectors. Just cut the hose to the
correct length and slide it into the connectors, when you try to pull
is out it locks and stays in. If you need to ever remove the hose
just push in on the connector and wiggle hose and it comes right
out. This hose is easy to use when estimating the hose
lengths. For the output from the compressor he made a hose for me
out of braded material so it can hold up to the heat generated by the
York. They do get hot when you run it for 20 minutes airing up 5
or 6 Jeeps.
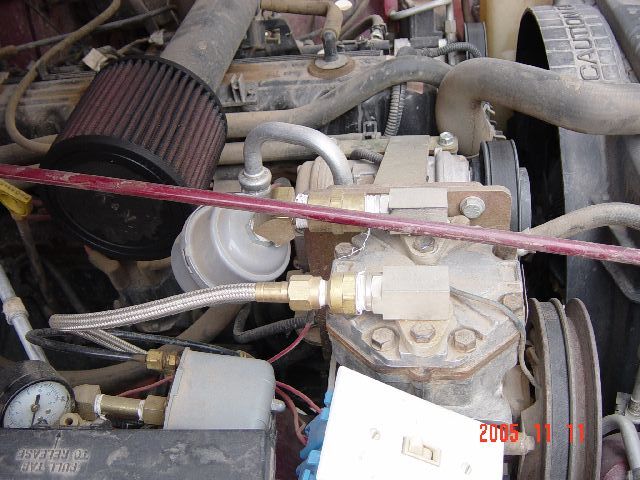
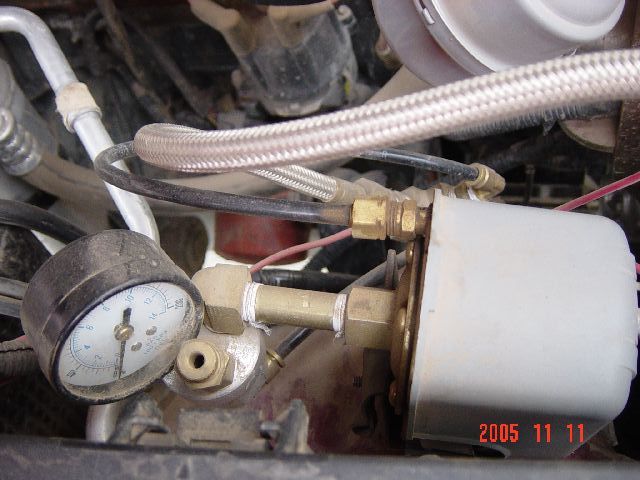
He also said that for the pressure switch line and the line for your
pop-off valve, and gauges you want to run an small line from your tank
back to a manifold that connect these three parts. If you place
them in the line right next to the output of the pump the pump will
pulsate with each compression stroke and wear these parts out fast.
Now for the Tank, I found a used Army surplus tank on the Internet and
purchased it. It's about a 2 gallon tank so it has good reserves
and was easy to tuck up under the frame rails of my TJ. Kilby has
a nice tank they sell, and I have seen them mounted in the bed and
under the jeep next to the frame. Mount you tank and run a 3/8
inch air line from the York output to the tank. And run a small
1/4 inch line back to where you want to place the gauges. Some
people put this in the cab along with an electric switch. I opted
to just put it under the hood, when I need to air up I am stopped and
just I can open the hood. If you want to use this York for your
air lockers you can easily adapted the system.
I connected the 1/4 inch line from the tank to a manifold with 3
outputs and mounted it to a bracket I made on the inside of the fender.
To adapte the system to your Air Lockers, I would say get another
smaller tank and run and air line to this tank through a pressure
regulator. Regulate the pressure into this tank at between 85-90
PSI and from this tank run a line to your air lockers. Your
lockers will have a nice supply of air at the correct pressure.
Now for the Electrical, The system has 2 switches, a fuse, a 12 volt
power supply, and needs to be grounded. I started at the battery
and ran a wire to a household electrical box, in this box I put a
normal house light switch. This is cheap and works without the need for
relays, plus it really give the system a stupid redneck look. Then
inside the pressure switch housing I connect to the pressure switch and
then the fuse. From here I ran the wire to the York compressor
clutch, from the clutch I ran the other wire to the ground. This
electric system is not hard, just make sure to solder the connections
or use good water and dirt resistant connectors. With this setup
the clutch on the York only turns on when the manual switch is on and
the pressure in the tank is lower than about 80 PSI which is adjustable.
Now finish up the plumbing on the output side of the tank. You
need a pressure relief valve, someplace in the system the tank is a
good place for it, or up on the manifold like I did. A drain for
the tank is also a very good idea, like any compressed air system they
get water in them. Run a line from the tank to either the front
or rear of you rig and place a quick disconnect fitting out it.
You may want to put a pressure regulator on the output of the tank if
your air tools require 90 PSI. Be sure to use the same style
quick disconnects that you have in your shop at home. Buy good
Milton connectors, I have found that the universal connector at the big
box stores don't last very long on the trail. I found Milton
connectors on the internet and at Cal-Ranch stores.
The installation is almost complete now it's time to test the system
and make some adjustments. The first step is to test your
pressure pop-off switch. This is the safety feature of the
system, when the pressure reaches the limit this opens and save the
tank from blowing up. I adjusted the pop-off value so it went on
at 100, and it worked then I slowly raise the pressure to about 125 and
left it. I then turned on the York and let it run until the
pressure switch turns it off. It turned off the York at 100, I
adjusted it up a bit to 120 PSI and called it good. I then let
air our and tested the pressure that the York turns on I adjusted this
to 80 PSI which seems to work pretty good. While making all these
adjustments I aired the tanks up and down many times.
One other thing I installed was a check value as the second fitting on
the output of my York compressor. This check valve is a one way
valve that only allows the air to flow from the York into the
Tank. This also works in conjunction with my pressure switch,
which has what they call an unloader feature. The unloader
feature of the pressure switch is a small line that is connected
between the York output and the check valve. When the pressure
switch reaches 120 PSI and turns off the clutch it opens this unloaded
valve. This drains all the air out of the line between the York
and the one way check valve. This help the York the next time it
starts there is no back pressure on it. I was told the York will
work with or without this check valve system, but I installed it anyway.
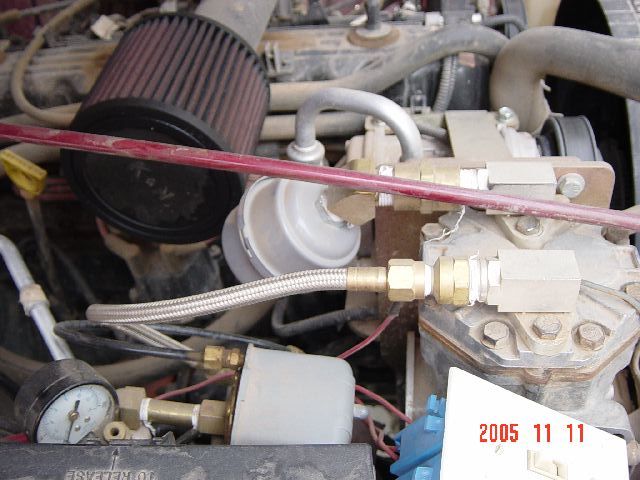
I mentioned that I had to remove the stock air box. As you can
see in the pictures It's a big box that fits on the fender and holds a
large square filter. I had two choices to replace this box.
Turbo City makes a complete air box replacement system that has a new
filer a smaller box and a new tube all designed to improve air
flow. I found a simpler less expensive option. I bought a
round K&N filer that has a 3 inch round opening. I was able
to cut the air intake tube between the stock air box and the input to
the engine. The new filter slips over the tube and is held on by
a hose clamp. This filer improves air flow into the engine. It is a bit exposed to the elements so I need to keep it clean and stay
out of the deep water and extremely muddy bogs.
When the system is all installed and running it will produce Air at a
volume that will rival you home air compressor. I have read and
heard that it will produce 3-4 CFM's. This maybe the case if you
add a large air tanks and runt he engine at a high rpm. When I am
airing up my tires I set the engine rpm at about 2500. This gives
me plenty of air and I can air up a 33x12.5 R15 tire from 12 lbs to 30
in about a minute. If I really need to I can run air tools I have
used a rotary grinder, an impact wrench, and air ratchets a bunch of
times out on the trail. This is one thing I added to my Jeep that
has really been useful.
NOTE: My email address is shown here in the picture with my Jeepin Dog. I had to put it in a picture so I wouldn't get so much spam email.
If you have questions please email me.

 NOTE: My email address is shown here in the picture with my Jeepin Dog. I had to put it in a picture so I wouldn't get so much spam email.
If you have questions please email me.
NOTE: My email address is shown here in the picture with my Jeepin Dog. I had to put it in a picture so I wouldn't get so much spam email.
If you have questions please email me.